This page is for my first project "make do and mend" for me it means for items that has been discarded to have a new purpose and with the virus a lot of items have been discarded. In this project many items will be able to be used for photos that will show what has happened to them and it will show what happens when anything is discarded
This year at school everything is different cause of the virus we are only restricted to our tables and what we do outside of school so our work isn't the best quality but once everything is safe the quality will rapidly improve
INSTRUCTION EVERY PHOTOGRAPHER USES TO PLAN A PHOTO
- choose an device
- pick a item
- move the item to an appropriate location
- make sure the background is appropriate
- go to a lower/middle/higher height for the picture
- focus/un-focus on the item
- choose an appropriate angle for the device to take a photo
- choose the lighting
- wait for the perfect moment
- take the photo
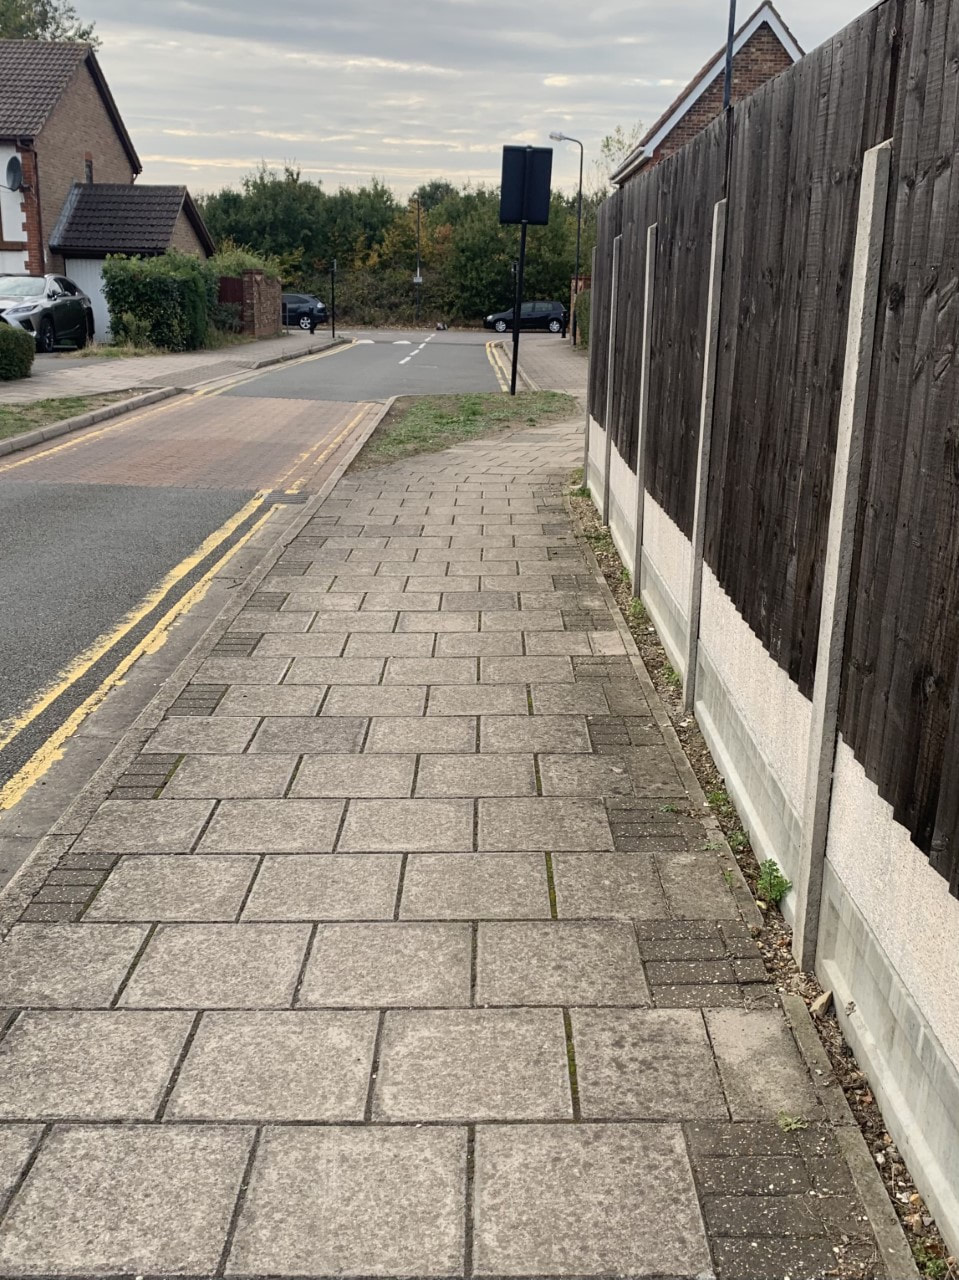
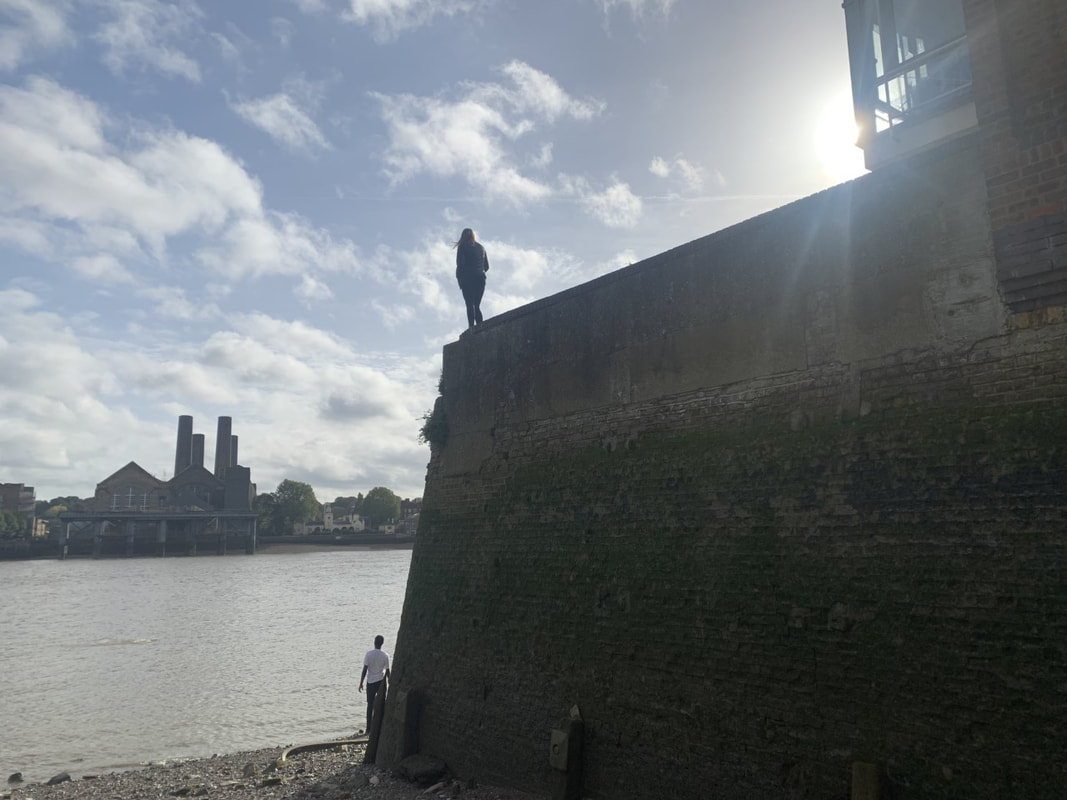
I was given an instruction to make a photography by one of my classmates:
-Stand at the end of your street, and take a photo in front of you.
-straight ahead, and aim down the street not at an angle, at 5pm
- no personal information in the picture
Here is the picture that I made:
WWW: |
EBI: |
|
I followed the instruction to the letter and made sure not to show personal infomation
|
the instruction contained more information so I would have something more difficult
|
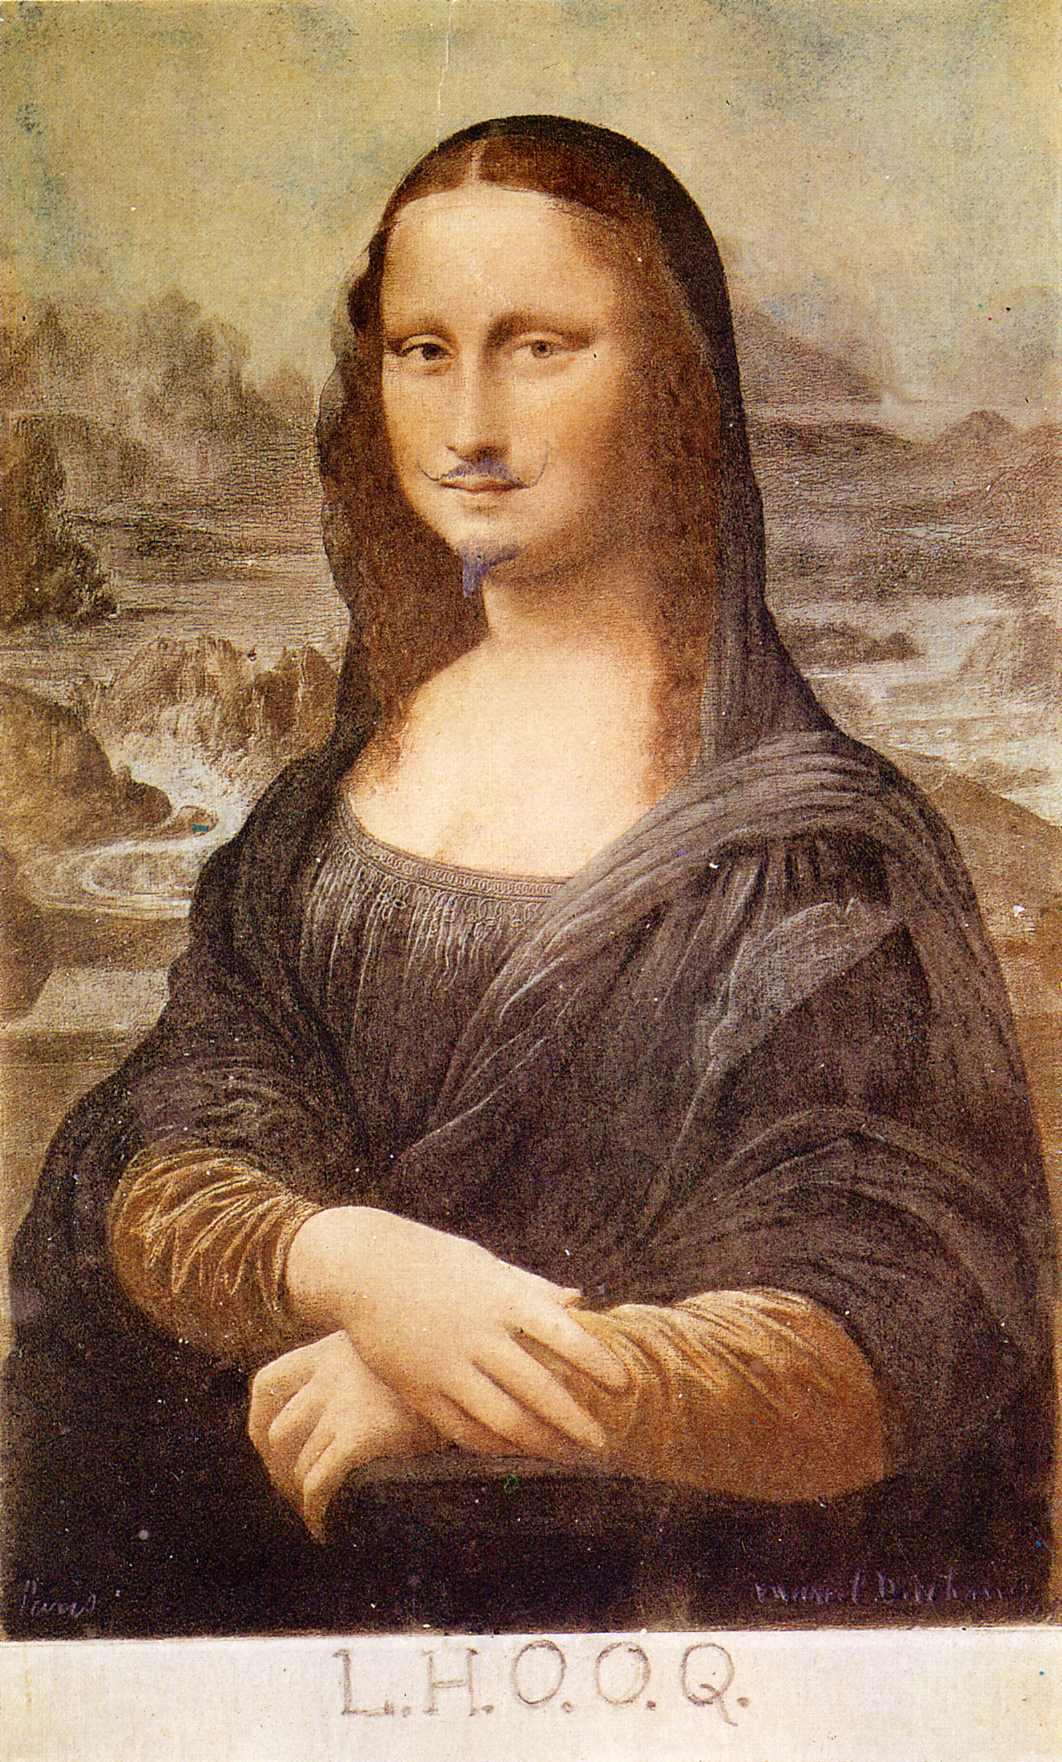
The ready made (L..H.O.O.Q) version of the Mona LisaThe work "Mona Lisa" was created in between 1503 and 1517 by Leonardo Da Vinci and went to the louvre since 1797 but then was stolen in 1911 by a worker at the louvre but returned a year later and was concealed by bullet proof glass for the best protection available at the time
L.H.O.O.Q is a ready made created by Marcel Duchamp, all he had to do was add some facial hair and L.H.O.O.Q. which means she has a nice ass
|
|
Kensuke Koike


Kensuke Koike is art start who has a very intresting form of work that you can find on https://www.instagram.com/p/CGN6e8_IsCm/?igshid=1hfbuztpgxf9m , I've linked his iInstagram because i could not decided out of all of his amazing work should i show
My Readymade Experiments:
|
|
|


WWW: |
EBI: |
|
I was careful with the work and spent time trying to perfect it
|
I should be able add more
|
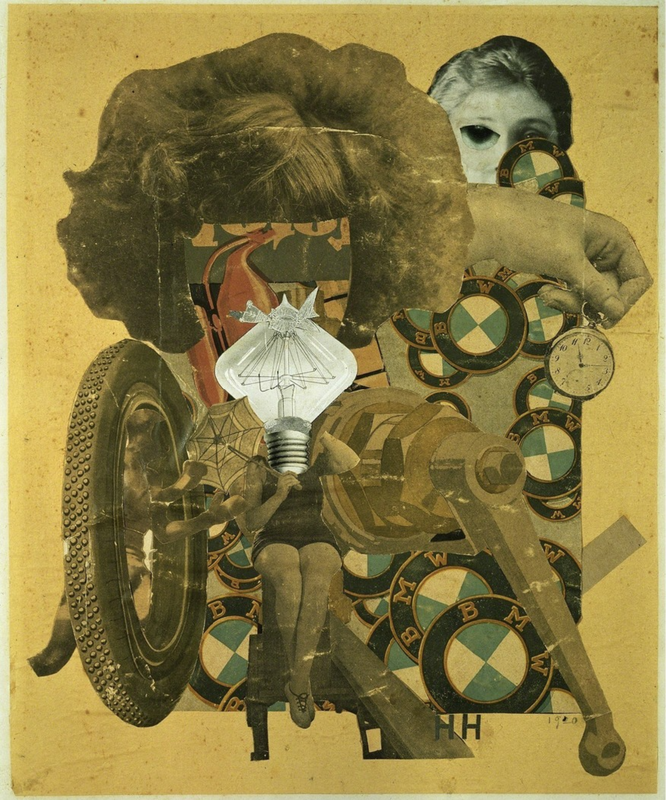
Hannah Höch - Das schöne Mädchen (The Beautiful Girl), 1920
- Marcel Duchamp’s picture ‘L.H.O.O.Q.’ (1919) uses a postcard reproduction of Leonardo da Vinci’s ‘Mona Lisa’ (1503-17). Describe Leonardo’s painting and explain why it is so famous.
Now describe Duchamp’s ‘L.H.O.O.Q.’ What has he done to the reproduction of Leonardo’s painting? What does the title mean? Why might he have added male facial hair to the female portrait?
All that was added was a mustache, goatee and L.H.O.O.Q to show that is it is ok to be any gender and even if you want to change your current one, it was the first piece of work that accepted people of their gender
What do you understand by the term ‘readymade’? In what ways is ‘L.H.O.O.Q.’ a readymade?
All that was added was a moustache, goate and L.H.O.O.Q so it was based on a “masterpiece” and change the gender and said there was a fire below
Why was Marcel Duchamp’s idea of the ‘readymade’ such a revolutionary idea in art?
Its revolutionary because it was able to reduce the amount of execs material and it only adds a few new things but still it’s a piece of art
Matt Lipps
Matt Lipps is a promising artist that paintings, he was born in 1975 (currently 45 years old) and was born in Oakland, California, USA. He is currently living in LA and continuing his career there. He had his first solo exhibition in 2006 when was just 31 years old


I suppose I’ve always been more interested in looking back than looking forward. In this instance, I decided to revisit my own archive of 35mm black-and-white negatives from early on in my personal history with photography. It was equally inspired by teaching chemical black-and-white photography to students whose age I would have been while exposing those early negatives, and by Library of Photography, the 17-volume compendium published and distributed by Time Life Inc. that provides the source material for all the cutout elements staged in my own Library series"
If you want to watch an interview with Matt Lipps go to https://vimeo.com/91767071
Daniel Gordon
Daniel Gordon is a forty year old male born in Brooklyn, New York, USA who went to Yale art and is currently a rising star in the photography community. He focuses on the layers in his work, as seen bellow. Daniel also focuses on the objects and people, you can see that in the gallery
Daniel Gordon has also wrote a book called: Flying pictures
Daniel Gordon has also wrote a book called: Flying pictures
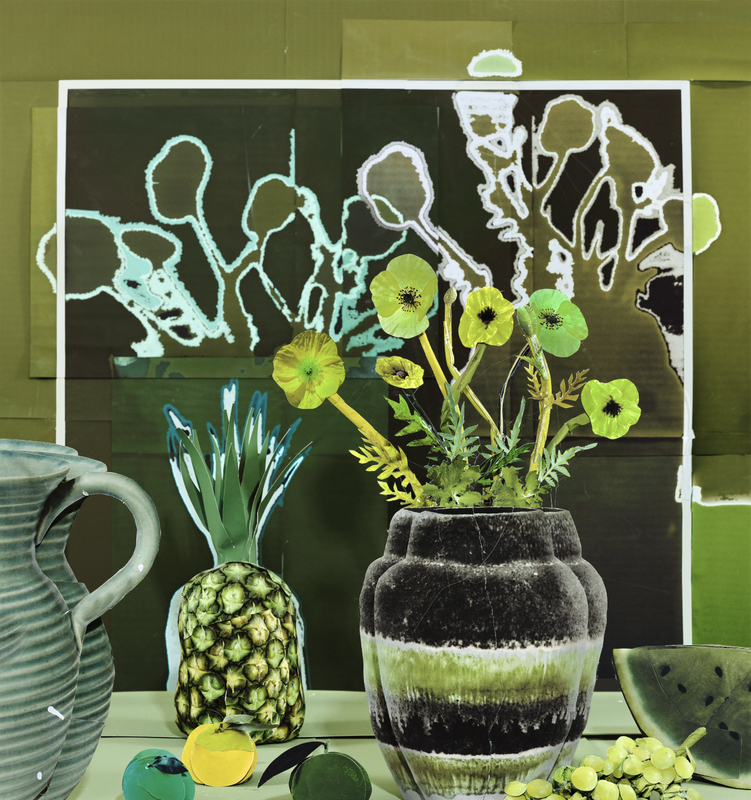
-I can see green is the focus of the image and it has a few types of fruit, a couple of pots and some poppies
-He is using cut outs from magazines and standing the up to have layers in the background. Then he applied a green filter on to the lens
-Daniel used the layers of the photo to make the scenery blossom, he has made it seem like the jugs are closer then there is the fruit then the plant pot
-Green ( the colour of life, renewal, nature, and energy), bright (bright background and items are chosen) & naturalistic (occurs naturally)
Three questions:
-Why did you choose to focus on the colour green?
-why did you change the colour of some of the fruit & plants?
-why did you choose fruit & plants that are not naturally green?


Homework 1/12/2020


Instruction Collage
Collaborative (Physical) Collage InstructionsYou will need a pair of scissors, a glue stick, a camera phone, a piece of A3 cartridge paper and a magazine (containing interesting photos).
- Cut or tear out 5 pages from your magazine. Choose pages with interesting images.
- Make a pile of these 5 pages on your desk.
- Take the top page and cut a hole in it (Note: it doesn't have to be perfect).
- Pass this cut out image to your neighbour (the person sitting nearest to you in class).
- Put the page with the hole in it at the bottom of your pile.
- Take the (new) top page and tear it in half. Pass one half to your neighbour (the same one as before) and put the other half at the bottom of your pile.
- Take the (new) top page and cut out a shape (Note: you could cut round an object or simply cut a random shape of your own choosing).
- Keep the cut-out shape, putting it at the bottom of your pile, and pass the page that remains to someone 3 places away (Note: make sure you don't end up with your own page).
- Take the (new) top page and tear a strip from the (top or bottom) edge. Keep the strip and pass the remaining page to someone else in the room.
- Place the A3 sheet of cartridge paper in front of you (portrait format).
- Without altering them, arrange the pieces of paper from your pile on the A3 sheet to create a pleasing collage. Carefully photograph your first arrangement.
- Again, without altering them, repeat this process, re-arranging the various elements on the A3 sheet until you are happy with the results. Photograph carefully.
- You may now swap 1 or 2 elements with your neighbour. Make a new arrangement and photograph carefully.
- You may now adapt the pieces in any way you like - cutting, tearing etc. Make a new collage, this time sticking them to the A3 sheet of cartridge paper.
- Photograph your finished collage carefully.
- On your Make Do and Mend web page add the title Collaborative Instruction Collage.
- Copy and paste this list of instructions.
- Add a Gallery and upload the images you have taken today of your collages.
- Write a brief evaluation (WWW/EBI) reflecting on what it was like to make a collage by following instructions and how you feel about the results.
- If you complete all of this, experiment with importing the photographs of your collages into Photoshop and experiment with manipulating them using the various tools available. Remember to take screen shots (Cmd + Shift + 4, then draw a box) of the process so you can also add these to your webpage. Also, remember to save the resulting images as Jpegs (File > Export > Save for Web, select Jpeg High) and add them to your website
Photos made


Photos used


|
WWW:
-chose many unique images and put the in different prospectives -Made a new collage many times and helped others |
EBI:
- was quicker creating the work - made the collages larger -used more photos to create more colour |
Prison Photography
Write about this film in your own words...
The Prison Photography of Nicoló Digiorgis
Write about this project and book in your own words here and add the genre captions to the pictures below...


Genre Photography Treasure Hunt
I decided to make some photographs using a list of instructions:
- The view through a window
- Your reflection in a shiny surface
- The back of someone’s head
- A small object shot from a low angle against a plain background
- The palm of someone’s hand with the word ‘help’ written on it
- A smile
- A plant growing in the wrong place
- A cracked paving stone
- A pile of clothes
- The creases in a bed sheet shot from above (with nothing else included)
- A close-up photograph of a computer, phone or television screen
- A map
- The spine of a book
- The inside of a fridge
- The sky
- Part of a fork
- The sole of a shoe
- The ceiling of your bedroom as you are lying on the floor
- A photograph of a photograph
- A glass of water
Virtual field trip


Collaborative GSV Project - Venice, Los Angeles
For this Project I was focusing on textures as you can see bellow


